Introduction
Welcome to the timeless art of crafting with your hands. There is a profound satisfaction in transforming a raw, rough plank of timber into a functional piece of furniture or a beautiful work of art. If you have been admiring custom cabinetry, intricate carvings, or sturdy outdoor benches and thinking, “I wish I could make that,” you have come to the right place https://fibozin.com. This is The Ultimate Beginner’s Guide to Woodworking, designed specifically to take you from a curious observer to a confident maker.
Starting a new hobby can feel overwhelming, especially one with as many tools, terminology, and techniques as woodworking. Many people are discouraged by the perceived cost of entry or fear of complex machinery. But here is the secret: you don’t need a massive workshop filled with industrial equipment to begin. Mastery of this craft starts with understanding a few core principles, acquiring a selection of foundational hand and power tools, and practicing fundamental skills safely.
This guide will break down the barriers to entry. We will walk you through the essential tools for woodworking beginners that form the backbone of any shop, explain the basic woodworking techniques you must master, and provide you with actionable steps to complete your very first project safely and successfully.
Key Takeaways
- Start Small and Smart: You do not need expensive, massive machinery. Begin with a well-chosen toolkit of manual and foundational power tools that prioritize versatility.
- Safety First, Always: Proper safety gear (especially eye and hearing protection) is non-negotiable. Learn the specific safety protocols for every tool before you use it.
- Master the Core Skills: Woodworking mastery is built on five pillars: measuring and marking accurately, cutting straight and clean, drilling precisely, assembling securely, and finishing professionally.
- Accuracy is Everything: Invest time in learning how to measure and mark properly. A mistake here ripples through the entire project and cannot be easily fixed later.
- Choose Your Wood Wisely: Begin your journey with forgiving, inexpensive, and stable softwoods like pine or structural lumber before moving to costly, harder, or exotic hardwoods.

Accurate Measuring and Marking: The First Crucial Skill
The foundation of every successful project isn’t a fancy tool; it’s the ability to measure and mark your workpiece accurately. As the old adage goes, “Measure twice, cut once.” In the context of this Ultimate Beginner’s Guide to Woodworking, this means adopting a methodical approach to preparation. If your layout lines are off by even a 1/16th of an inch, your cuts will not align, your joints will be loose or skewed, and the final assembly will be flawed. Mistakes made during the measuring and marking phase are incredibly frustrating because they propagate throughout the build and are often irreparable.
When measuring, always use high-quality, calibrated tools that are easy to read. Be consistent with how you measure: for example, measuring from the same starting point or reference face every single time. When marking, use a sharp pencil or a dedicated marking knife. A dull line can be a 1/32nd of an inch wide or more, introducing unnecessary variance. The mark is your target; aim for the centerline of that mark with your saw blade. Finally, label your pieces clearly (e.g., “A1 – Top,” “B2 – Leg”) so you do not confuse identical-looking parts during the build.
[Internal Link: Master layout and learn advanced measuring tricks in our dedicated layout techniques guide]
5 Non-Negotiable Safety Practices
Before we discuss the equipment, we must emphasize woodworking safety. Every guide on the The Ultimate Beginner’s Guide to Woodworking must start here. Woodworking is rewarding but inherently dangerous without respect for the materials and tools.
- PPE (Personal Protective Equipment): Never operate any tool without safety glasses. Hearing protection (earplugs or earmuffs) is essential for any power tool usage. Wear a dust mask or respirator when sanding or cutting dusty materials.
- Dress Appropriately: No loose clothing, dangling jewelry, or unrestrained long hair that can catch in moving parts. Wear sturdy, non-slip footwear.
- Keep Tools Sharp: This seems counterintuitive, but a sharp blade or chisel is significantly safer than a dull one. A dull tool requires more force, which increases the likelihood of slipping and causing an accident.
- Work in a Clutter-Free Zone: Keep your workbench and the floor around it clean. Trip hazards and accumulated sawdust are dangerous, especially near machinery.
- No Drugs or Alcohol: This should go without saying, but absolute sobriety is mandatory when working in a shop. Tiredness can be just as deadly; do not work when you are exhausted.
[External Link: Consult the National Institute for Occupational Safety and Health (NIOSH) woodworking safety checklist for comprehensive guidelines]

The 10 Essential Tools for Woodworking Beginners
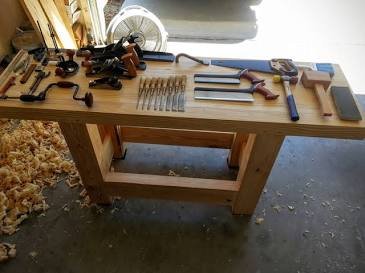
When you’re starting out, your focus should be on building a foundational beginner woodworking tool kit. Do not try to acquire everything at once. This list represents the versatile, high-impact essentials that will allow you to complete almost any beginner-to-intermediate project effectively. Prioritize quality over quantity; a well-made tool is a joy to use and will last for generations Wikipedia.
The Foundation: Measuring & Marking
These are the most important items in your shop. If you cannot mark accurately, you cannot cut accurately.
- Tape Measure: Crucial for initial rough measurements and large layout work. Get a 16- or 25-foot tape that is robust and easy to read.
- Combination Square: Your most versatile marking tool. Use it for accurate 90-degree and 45-degree angles, checking squareness, marking depth, and transferring measurements.
- Rafter Square (or Speed Square): An alternative, rugged option often preferred for framing or outdoor projects. Its triangle shape quickly marks 90 and 45 angles and is great as a saw guide.
- Marking Pencil or Knife: For creating precise layout lines. Keep your pencil sharp! A marking knife leaves an indelible score that saw blades can track.
The Foundational Hand Tools
Before mastering power tools, you must master manual cutting and manipulation. It develops a “feel” for the grain and timber.
- Hand Saw: While you will likely use a power saw eventually, a traditional hand saw (specifically a universal or hybrid-cut pull-saw like a Japanese Ryoba) is vital for quickly making small cuts safely and quietly.
- Hammer & Nail Set: A sturdy claw hammer is indispensable for assembly, and a nail set drives finish nails below the surface of the wood.
- Chisels: A set of quality bevel-edge bench chisels (typically 1/4, 1/2, 3/4, and 1-inch) is essential for cleaning up joints, paring end grain, and installing hinges. Learn how to sharpen them; a sharp chisel is a safe tool.
- Block Plane (Optional but Recommended): While not strictly required initially, a small block plane is one of the most satisfying tools to use. It’s unmatched for smoothing end grain, trimming sharp edges, and quickly dialing in a tight fit on a joint.
The Crucial Power Tools
These items introduce speed and efficiency without sacrificing safety or accuracy (if used correctly).
- Drill/Driver (Cordless): The undisputed workhorse of any shop. From drilling pilot holes to driving screws, you will use this on every single project. A 12V or 18V model with an adjustable clutch and a variety of bits is required.
- Random Orbit Sander: Getting a perfect, silky-smooth finish is impossible without efficient sanding. This sander makes quick work of large surfaces, and its motion prevents ugly swirl marks. Get one with good dust collection.

Master These 5 Basic Woodworking Techniques First
While fancy joinery looks impressive, the vast majority of useful and beautiful woodworking projects are constructed using just a few simple basic woodworking techniques. Every expert was once a beginner, and they all started by mastering these five pillars. Focusing on these skills first will build your confidence, ensure project success, and provide a strong foundation for learning advanced skills like dovetails or mortise-and-tenons later.
1. Accuracy inMeasuring and Marking (Key Review)
We have already emphasized this point, but it bears repeating. Mastery starts here. Use accurate tools consistently, make thin, precise marks, and label your pieces. Every other technique relies entirely on this one being done correctly. Errors introduced during layout cannot be magically erased later.
2. Cutting Straight and True
Whether using a hand saw or a power saw, your goal is to make cuts that are both square (90 degrees to the face) and straight (following your marked layout line). If you struggle with freehand, The Ultimate Beginner’s Guide to Woodworking recommends a saw guide or clamping a square or block of wood along your cut line to act as a physical fence. When using a pull-saw (Japanese style), keep your arm straight and pull smoothly; when pushing a western-style saw, apply even pressure and focus on long, rhythmic strokes.
[Internal Link: Improve your accuracy and learn advanced techniques in our full cutting and squaring guide]
3. Precision Drilling and Driving
Drilling the correct size hole, to the correct depth, at the correct angle is a foundational skill. It prevents wood from splitting (especially in hardwoods) and ensures screws hold securely. Always use the proper bit for the job (twist bits for shallow holes, brad point bits for clean precision, spade or Forstner bits for large holes). For driving screws efficiently, utilize your drill’s clutch to prevent overdrive, and always select the correct bit for the screw head to avoid stripping.
4. Strong and Clean Assembly
This technique is about bringing parts together securely and permanently. For beginners, this almost always means using high-quality PVA (polyvinyl acetate) wood glue in combination with mechanical fasteners like screws or nails. Apply an even bead of glue (remember, less is often more to prevent excessive squeeze-out), and ensure your joints are clamped tightly and held perfectly square (check them with your square) while the glue dries (typically 30–60 minutes for initial set).
5. Finishing for Durability and Beauty
Finishing isn’t just about aesthetics; it’s about protection. A proper finish shields the timber from moisture and wear. This process starts with aggressive and methodical sanding, progressing from coarse-grit sandpaper (like 120-grit) to fine-grit (like 220-grit). For beginners, we highly recommend user-friendly, wipe-on finishes like polyurethanes (in satin or semi-gloss sheens) or simple penetrating oils (like tung or linseed oil). These are incredibly forgiving, highlight the natural grain, and are easy to apply and repair.
Conclusion
Congratulations! You have just completed the most crucial step of your new craft: education. This The Ultimate Beginner’s Guide to Woodworking has provided you with the foundational knowledge you need to begin your journey with confidence. You now understand that while advanced woodworking can be exceptionally complex, the vast majority of beautiful, useful, and satisfying projects are built upon a simple foundation of 10 essential tools and 5 masterable techniques. You know the importance of absolute safety, the necessity of accurate measurement, and how to select equipment that prioritizes versatility over specialization.
Woodworking is a journey of continuous learning, problem-solving, and patience. Your first project may not be perfect—and that is exactly as it should be. The real value is not just in the final object, but in the skills you build, the confidence you gain, and the deep, unique satisfaction that comes from transforming a simple idea into reality with your own two hands. So, take the next step: assemble your beginner tool kit, choose a forgiving wood like pine, and begin creating. Start today, and build something extraordinary.
Frequently Asked Questions (FAQs)
What are the very best first power tools for a woodworking beginner?
The single most essential first power tool is a quality cordless drill/driver. You will use it on literally every single project, from drilling pilot holes to driving screws. The second power tool we recommend acquiring immediately is an orbital sander; it is the most efficient way to achieve a professional, smooth finish that highlights the timber’s grain.
Do I really need specific safety gear just for basic woodworking?
Yes, absolutely. Personal Protective Equipment (PPE) is non-negotiable, even for beginners. You must wear safety glasses every single time you make a cut, sand, or use a hammer. Hearing protection is vital for any power tool use. Dust masks are required when sanding or sawing. Safety cannot be skipped; it is the most important skill you will ever learn.
Is woodworking an expensive hobby to start?
It certainly doesn’t have to be. While you can spend thousands on advanced machinery, you can easily start with a well-chosen beginner woodworking tool kit (see our list) costing less than $200–$300. Start by building simple projects with affordable softwoods like pine or home-center lumber. You can always upgrade and add specialized tools as your skills and project ambitions grow.
Where can I find good beginner woodworking plans and project ideas?
There are numerous exceptional resources for free and affordable beginner woodworking plans. Websites like Ana White, Popular Woodworking, and The Woodwhisperer offer extensive libraries of plans tailored specifically to newcomers, often with detailed cut lists, 3D models, and video tutorials. Start with simple structures like a box, a sturdy work stool, or basic shelving.
Leave a Reply